ALLEN & HEATH - XONE:K2
SETUP
STEP 1 : CONNECTIONS
- Connect amplifier or amplified speakers to the rear-panel RCA Outputs of the device, if you need to use its built-in audio interface.
- Connect your Headphones to the front panel socket using a 1/8" cable or adapter.
- When the above connections are done, connect the Allen & Heath Xone:K2 to a USB port of your computer via the rear-panel USB socket, using a USB cable.
Alternatively, you can connect the Xone K2 to a Xone compatible mixer (Xone: 23C or Xone:43C) via the X:LINK sockets using the provided cable. See Advanced Setup.
STEP 2 : DRIVERS
Mac OS : XONE:K2 supports Apple’s Core Audio/Core MIDI framework, so you do not need to install Device Drivers for use with macOS platforms.
Windows : Download and install the Xone K2 PC driver and Device software (firmware) from https://www.allen-heath.com/ahproducts/xonek2/.
STEP 3 : VirtualDJ 8 Setup
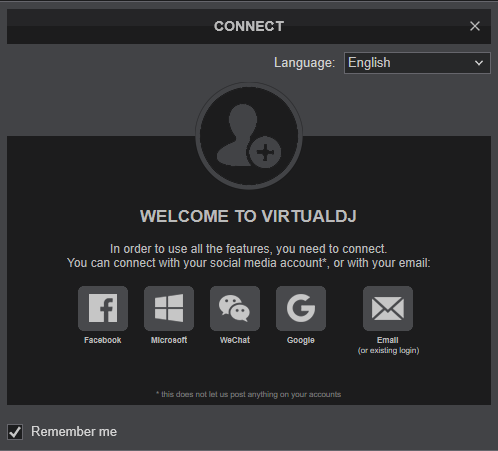
Once VirtualDJ is launched, a Connect window will appear to enter your virtualdj.com account credentials.
A Pro Infinity, a Plus Controller or a Pro Subscription License is required to fully use the Xone K2. Without any of the above Licenses, the controller will operate for 10 minutes each time you restart VirtualDJ.
https://www.virtualdj.com/buy/index.html
Note: The Detection window will not be offered if the Xone K2 is connected via X:LINK to a compatible Xone mixer.
Click on the "XONE K2" if your speakers are connected to the Main Output at the rear side of the Xone K2.
You can still make changes in the Audio setup from VirtualDJ Settings->AUDIO tab.
Press OK.
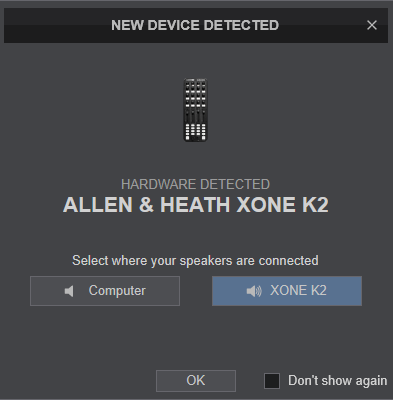
The unit is now ready to operate.
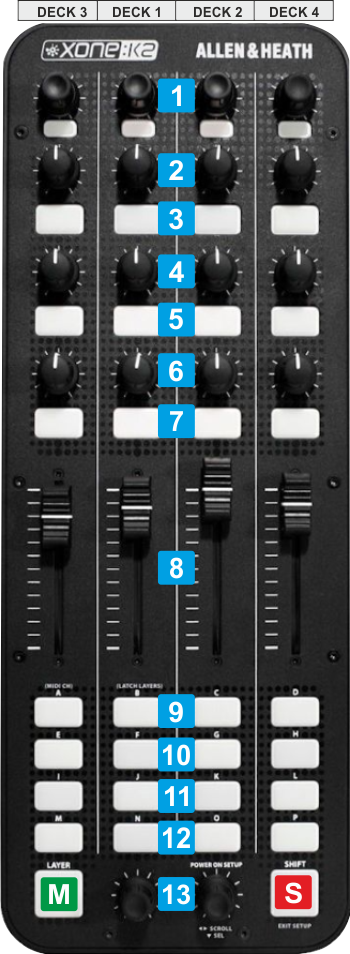
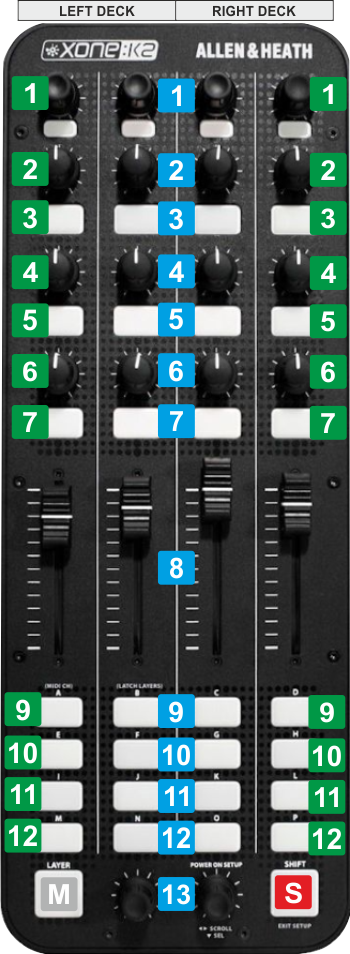
CONTROLS - 4 DECKS MODE
The following functionality is offered automatically when a 4 Decks skin layout is used in VirtualDJ. The Deck/Channel order is 3-1-2-4 by default, but can be changed to 1-2-3-4 (See VirtualDJ Options->MixerOrder setting).
The Top and Bottom section of the Xone K2 can be set to 2 different modes, via the LAYER button, as described in the following tables.
KEY
ACTION
SHIFT (SECONDARY) ACTION
When in Folders list, push to set focus to the Songs list, or long press to open/close sub-folders
When in Songs list:
- Push the Left Encoder to load the selected Track in Browser to Deck 1.
- Push the Right Encoder to load the selected Track in Browser to Deck 2
Push the Right Encoder to load the selected Track in Browser to Deck 4
TOP BUTTONS/KNOBS - EQ MODE (default)
KEY
ACTION
SHIFT (SECONDARY) ACTION
Push to enable/disable the selected Loop
TOP BUTTONS/KNOBS - FX MODE
KEY
ACTION
SHIFT (SECONDARY) ACTION
Push to enable/disable the selected Loop.
When FX SELECT mode is enabled, scroll through the Effects list. Push to select the highlighted Effect for the FX Slot
BOTTOM BUTTONS - CONTROL MODE (default)
KEY
ACTION
SHIFT (SECONDARY) ACTION
BOTTOM BUTTONS - HOTCUES MODE (default)
KEY
ACTION
SHIFT (SECONDARY) ACTION
CONTROLS - 2 DECKS MODE
The following functionality is offered automatically when a 2 Decks skin layout is used in VirtualDJ. The left side of the Xone K2 offers controls for Left Deck and the right side controls for the Right Deck.
The top section (knobs and buttons) offers controls for EQ (Stems) and Effects for the Left/Right Deck.
The bottom section (16 buttons) can be set to 2 different modes, as per the following tables.
KEY
ACTION
SHIFT (SECONDARY) ACTION
When in Folders list, push to set focus to the Songs list, or long press to open/close sub-folders
When in Songs list:
- Push the Left Encoder to load the selected Track in Browser to Deck 1.
- Push the Right Encoder to load the selected Track in Browser to Deck 2
TOP INNER BUTTONS/KNOBS - LOOP & EQ
KEY
ACTION
SHIFT (SECONDARY) ACTION
Push to enable/disable the selected Loop
TOP OUTER BUTTONS/KNOBS - EFFECTS
KEY
ACTION
SHIFT (SECONDARY) ACTION
When FX SELECT mode is enabled, scroll through the Effects list. Push to select the highlighted Effect for the FX Slot
BOTTOM BUTTONS - CONTROL+HCUES MODE (default)
KEY
ACTION
SHIFT (SECONDARY) ACTION
BOTTOM BUTTONS - PADS MODE
KEY
ACTION
SHIFT (SECONDARY) ACTION
ADVANCED SETUP
X:LINK
You can connect a Xone K2 directly to your computer via the USB port, or via X:LINK to another compatible Xone device. Do not use both connections.
There are 2 X:LINK sockets at the rear panel of the Xone K2, to chain more Xone series devices.
If you need to connect 2 or more Xone K2 devices and use in VirtualDJ, you will need to connect them via USB to your computer, or else all devices will control the same VirtualDJ Decks and offer the same functionality.
If you connect a Xone K2 to a Xone compatible mixer (43C or 23C) via X:LINK, VirtualDJ will not detect Xone K2 as a separate MIDI device, but its MIDI functionality and customization will be available through the Xone 43C/23C device.
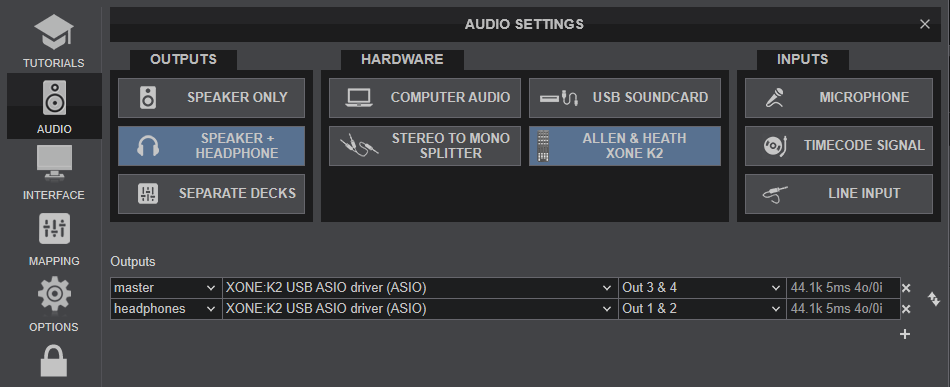
AUDIO SETUP
The following image displays the default Audio setup for the Xone K2, which requires speakers and Headphones to be connected at the rear and front panels respectively.
Note that the USB Audio interface (sound card) - or the special XONE K2 button - will not be available in VirtualDJ Audio Setup if the Xone K2 is connected via LINK to a compatible Xone mixer.
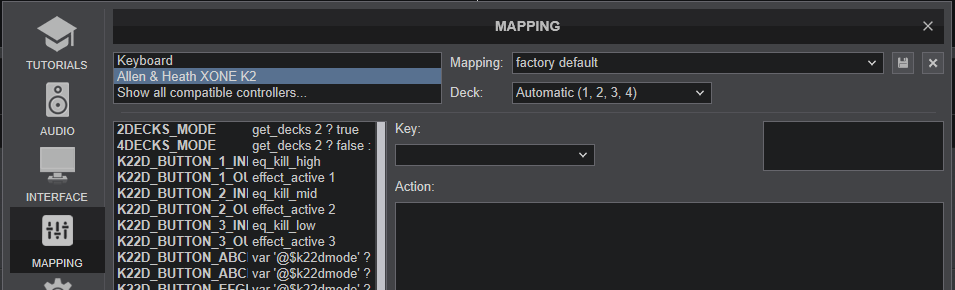
MIDI SETUP
The Xone K2 should be visible in the MAPPING tab of VirtualDJ Settings and the “factory default” available/selected from the Mappings drop-down list.
The factory default Mapping offers the functions described in this Manual, however those can be adjusted to your needs via VDJ Script actions.
Find more details at https://www.virtualdj.com/wiki/VDJ8script.html
Mapping related Notes :
- The Xone K2 device will not be offered as a connected Hardware in this page, if the Xone K2 is connected via X:LINK to a compatible Xone Mixer.
- There are 2 kind of MIDI keys offered in factory Mapping, named as K22D and K24D (stand for K2 2 Decks and K2 4 Decks), depending on the value of the keys named as 2DECKS and 4 DECKS. If you need to assign a key with an action and keep this along both modes, you will need to assign both K22D_ and K24D_ keys.
- If you wish the 2 modes not be related to the skin layout, you can assign the 2DECKS and 4DECKS to different query, as long as they don't return true/false on same conditions.
Note
Starting from VirtualDJ 8.5 (Build 6464) the factory default mapping has been highly improved/ modified, thus Custom Mappings created before this Build will not properly operating. We strongly advise you to start your own Custom mapping based on the default one, however if you need your old Custom mapping to work, please contact our Support.
LATCH LAYERS & MIDI CHANNEL
The Xone K2 offers the ability to select a different MIDI Channel and Latch Layer. Please note that for VirtualDJ, the device needs to be on the default MIDI Channel 15 and Latch Layer Off.
Please refer to the Allen & Heath Xone K2 Manual to set the device as above.
